 Pin it
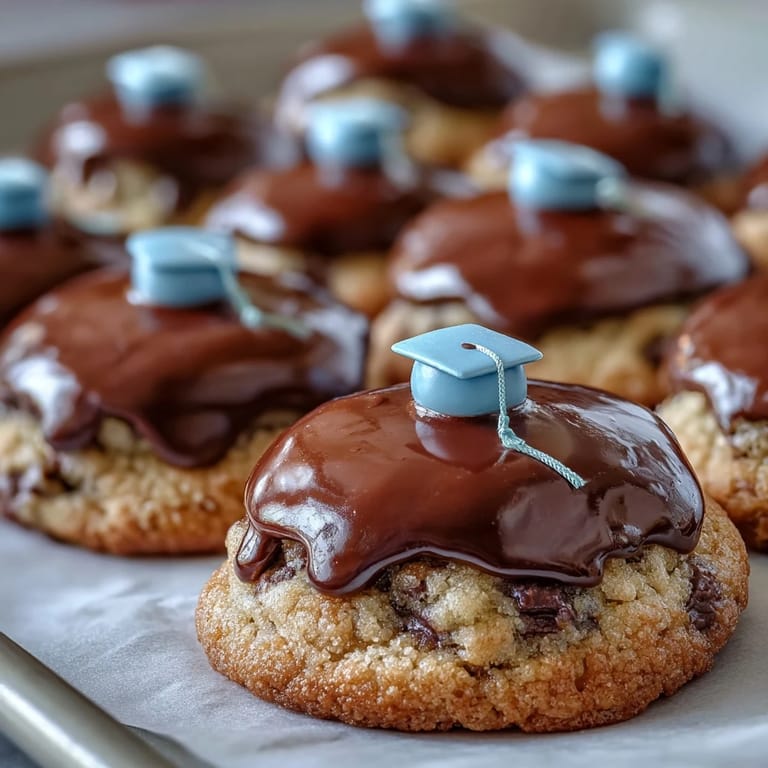
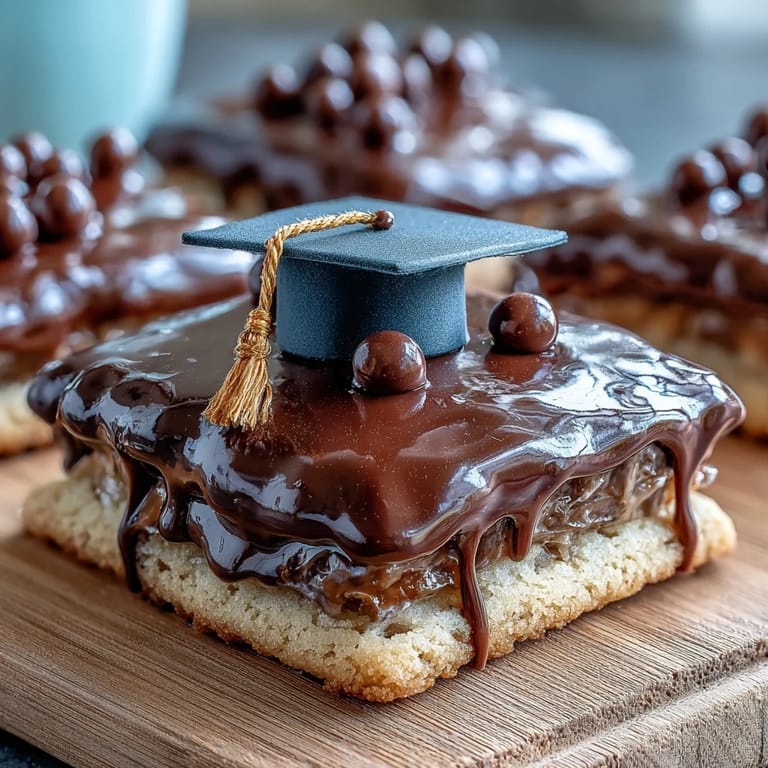
 My friend texted me three weeks before her daughter's graduation asking if I could help with decorations. I immediately thought of cookies shaped like caps, but standard recipes felt boring. That's when I started experimenting with royal icing in black and gold, recreating those iconic mortarboards on edible canvas. The first batch came out slightly lopsided, but something about their imperfection made them feel personal, like they'd actually been made by someone who cared. Now whenever I see a graduation invitation, I think of that afternoon in my kitchen, piping tiny tassels and laughing at my uneven lines.
I made these for my neighbor's graduation party last year, and something unexpected happened. A grandmother pulled me aside to tell me she'd tried decorating cookies like this in the 1960s but gave up because her icing kept cracking. Watching her pipe the yellow tassels on mine, getting it right this time with better techniques, reminded me that recipes are really just shortcuts for accumulated wisdom.
Ingredients
- All-purpose flour: The foundation of these cookies; make sure it's fresh because old flour can make them spread too thin and lose their shape.
- Unsalted butter: Softened butter is non-negotiable here because it creams properly with sugar, creating that light, almost cloud-like texture that makes these cookies melt on your tongue.
- Granulated sugar: This keeps the cookies crisp rather than cake-like, which you want when you're balancing decorative icing on top.
- Egg and vanilla: Just one egg binds everything while the vanilla adds that subtle warmth that makes people ask what your secret ingredient is.
- Powdered sugar: Sifted powdered sugar is essential for smooth royal icing; lumps will sabotage your decorating dreams faster than you'd think.
- Egg whites or meringue powder: Meringue powder is safer if you're worried about raw eggs, and honestly it works just as well for icing that hardens beautifully.
- Gel food coloring: Gel colors are more vibrant than liquid ones and won't thin out your icing, which matters when you're trying to achieve that deep black on graduation caps.
- Mini yellow candies: These become the tassels that hang from each cap, adding that final detail that makes people realize you actually took time on these.
Tired of Takeout? 🥡
Get 10 meals you can make faster than delivery arrives. Seriously.
One email. No spam. Unsubscribe anytime.
Instructions
- Mix the dry ingredients together:
- Whisk your flour, baking powder, and salt in a bowl so everything's evenly distributed before it meets the butter mixture. This prevents pockets of baking powder that could create weird bumps on your finished cookies.
- Cream butter and sugar until fluffy:
- Beat them for a solid 2 to 3 minutes until the mixture looks pale and slightly airy, which means you're incorporating air bubbles that make the cookies tender. You'll know it's ready when it looks almost like fluffy clouds.
- Add the egg and vanilla:
- Mix these in thoroughly until they're fully incorporated and the dough looks homogeneous. This is when your kitchen starts smelling like actual baking instead of just buttery sweetness.
- Combine wet and dry ingredients:
- Add the flour mixture gradually, mixing just until the dough comes together, because overworking it will make your cookies tough. You're looking for a cohesive dough without any visible flour streaks.
- Chill the dough:
- This 30-minute rest is when the gluten relaxes and the flavors meld together, which means your cookies won't spread as much during baking. Use this time to set up your decorating station and take a breath.
- Roll and cut:
- Roll the chilled dough to exactly 1/4-inch thickness and cut graduation cap shapes carefully, because thin spots will bake faster and brown unevenly. If you don't have a graduation cap cutter, square cookies work just fine and actually decorate more easily.
- Bake until just golden:
- Watch them carefully around the 8-minute mark because the difference between crispy and overdone is honestly about 90 seconds. The edges should be barely golden while the centers still look slightly pale.
- Make the royal icing:
- Beat egg whites until foamy, then gradually add powdered sugar while beating, watching it transform into glossy stiff peaks that could hold their shape for days. If you're using meringue powder, whisk it with water first until foamy before adding sugar.
- Divide and color the icing:
- Keep most of it white or black, then make a smaller batch yellow for the tassels, because you'll need way more of the cap color than the details. Gel coloring goes a long way, so add it drop by drop and stir until the color is completely even.
- Outline and flood each cookie:
- Use slightly thicker icing to pipe an outline around the cap shape, then thin your black icing with a teaspoon of water and flood the interior by spreading it with a toothpick. This should set for at least 30 to 60 minutes until it feels dry to the touch.
- Pipe the tassel and details:
- Switch to your yellow icing in a piping bag and add a small circle at the top of each cap, then a thin line hanging down where the tassel would be. Top it with your candy while the icing's still slightly tacky so it adheres.
- Let everything dry completely:
- This might take several hours or even overnight, but it's crucial because handling them too early will smudge the icing and ruin your work. Once they're fully set, they'll stay beautiful for days.
 Pin it
 The moment that stuck with me was when a teenager opened a box of these cookies at their graduation party and actually smiled, not the polite kind but a real one. These cookies somehow felt like edible proof that someone believed in their accomplishment enough to spend time on details.
The Secret to Perfect Cookie Texture
Chilling the dough is the difference between cookies that spread into thin pancakes and ones that stay properly shaped. I learned this the hard way when I skipped the chill step once and pulled cookies out of the oven that looked like they'd melted into each other. The gluten in the flour needs that rest to relax properly, and the cold butter needs to stay in tiny pockets just long enough to create steam during baking, which is what gives you that perfect crispy-yet-tender texture.
Royal Icing Mastery
Royal icing intimidated me at first because it seemed temperamental, but it's actually just sugar and egg whites having an honest relationship. The key is beating the egg whites until they're foamy before you even think about adding sugar, and then being patient as the mixture transforms from soupy to shiny to stiff. I've had batches that looked broken halfway through and then suddenly came together into gorgeous glossy peaks, so if yours looks weird at the 3-minute mark, just keep beating.
Decorating Strategy and Make-Ahead Magic
The smartest thing you can do is bake your cookies completely one or two days before you decorate them, which gives you flexibility and actually results in better-looking cookies. Freshly baked cookies have moisture still leaving them, which can interfere with icing adhesion, but day-old cookies have stabilized and accept icing like they were made for each other. You'll also have plenty of time to set up your decorating station with all your colors and tools arranged like you're in a tiny cookie factory.
- Outline first with thicker icing so you have a dam that keeps the flooding icing from dripping off the edges.
- Let the outline set for about 10 minutes before flooding so it stays in place while you spread.
- Have wet paper towels nearby because icing on your hands gets messy fast, and clean hands make the whole process feel more controlled.
 Pin it
 These cookies have become my favorite thing to make for life's milestones because they celebrate not just the achievement but the person being celebrated. Every time someone bites into one, they get buttery sweetness, smooth icing, and the feeling that they mattered enough for someone to spend time on details.
Recipe FAQ
- → What ingredients create the cookie base?
All-purpose flour, baking powder, salt, unsalted butter, granulated sugar, a large egg, and vanilla extract form the crisp and buttery cookie dough.
- → How is the royal icing prepared?
Royal icing is made by beating egg whites or meringue powder with powdered sugar until glossy stiff peaks form, flavored with vanilla extract, then tinted with gel food coloring.
- → How do I achieve the distinct graduation cap shape?
Roll the chilled dough to about 1/4-inch thickness and cut shapes using a graduation cap or square cookie cutter before baking.
- → What is the best way to decorate the cookies?
Outline and flood each cookie with black icing, allow it to set, then pipe a yellow tassel with royal icing and add candy pearls or mini M&Ms for detail.
- → Can these cookies be prepared in advance?
Yes, bake the cookies up to two days ahead and decorate them the next day for optimal freshness and ease.