 Pin it
 My neighbor knocked on my door one Saturday morning holding a photo on her phone of this wild circular quesadilla thing she'd seen online. We stood in my kitchen staring at it, trying to figure out how the pieces stayed together without falling apart. An hour later, my countertop was covered in cheese, folded tortillas, and two women laughing because we couldn't stop eating the test pieces. That's how this became my go-to when I need something that looks impressive but doesn't require culinary school.
I brought this to a potluck once and watched three people take photos before anyone even grabbed a piece. Someone asked if I catered it. I didn't correct them right away. The truth is, my kids helped me fold the tortillas while we listened to music in the kitchen, and the whole thing came together during one episode of a sitcom. It's become the recipe I make when I want to feel like I have my life together, even when I definitely don't.
Ingredients
- Small flour tortillas: The 5 to 6 inch size is perfect because they fold into neat triangles without too much overhang, and they crisp up evenly in the oven.
- Shredded cheddar cheese: This brings the sharp, familiar flavor that makes every bite feel comforting and a little indulgent.
- Shredded Monterey Jack cheese: It melts like a dream and adds a creamy, mild richness that balances the cheddar.
- Cooked black beans: These add heartiness and a slight earthiness, plus they help the filling hold together instead of just oozing out.
- Red bell pepper: Finely diced so you get little pops of sweetness and color in every fold.
- Green onion: Thinly sliced for a mild, fresh bite that cuts through all that melted cheese.
- Ground cumin: Just enough to give a warm, slightly smoky undertone without overpowering anything.
- Chili powder: Adds a gentle heat and depth that makes this taste intentional, not just cheesy.
- Smoked paprika: This is the secret to that faint campfire flavor that makes people ask what's in here.
- Unsalted butter: Melted and brushed on top so the tortillas turn golden and crispy, not pale and sad.
- Fresh cilantro: Chopped and sprinkled on at the end for a bright, herby finish.
- Prepared salsa: Use your favorite kind, because this is what everyone will dip into first.
- Sour cream: Cool, tangy, and essential for balancing all the warm, spicy, cheesy flavors.
- Avocado: Sliced and optional, but it makes the whole platter feel a little more special.
- Lime wedges: A squeeze over the top right before you eat adds a brightness that wakes everything up.
Tired of Takeout? 🥡
Get 10 meals you can make faster than delivery arrives. Seriously.
One email. No spam. Unsubscribe anytime.
Instructions
- Get the oven ready:
- Preheat your oven to 400°F and line a large baking sheet with parchment paper so nothing sticks and cleanup is a breeze.
- Mix the filling:
- In a large bowl, toss together both cheeses, black beans, bell pepper, green onion, cumin, chili powder, smoked paprika, salt, and pepper until everything is evenly distributed. It should look colorful and smell amazing.
- Cut the tortillas:
- Slice each tortilla in half to create 32 semicircles. A sharp knife and a cutting board make this quick and tidy.
- Fill and fold:
- Place a tablespoon of the cheese mixture on each semicircle, then fold the straight edge over the filling to form a triangle. Press gently along the edges to seal, but don't worry if a little cheese peeks out.
- Arrange the ring:
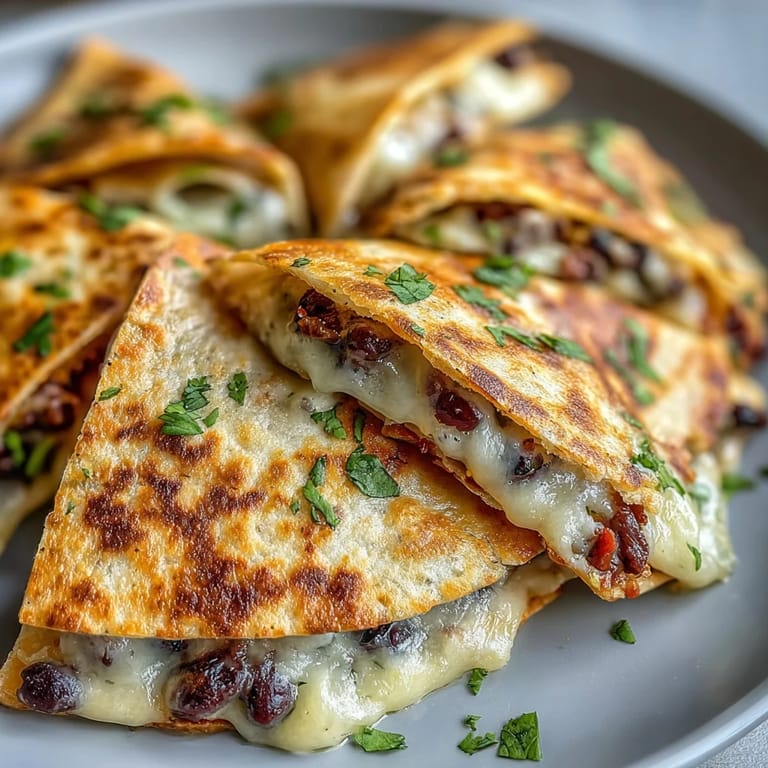
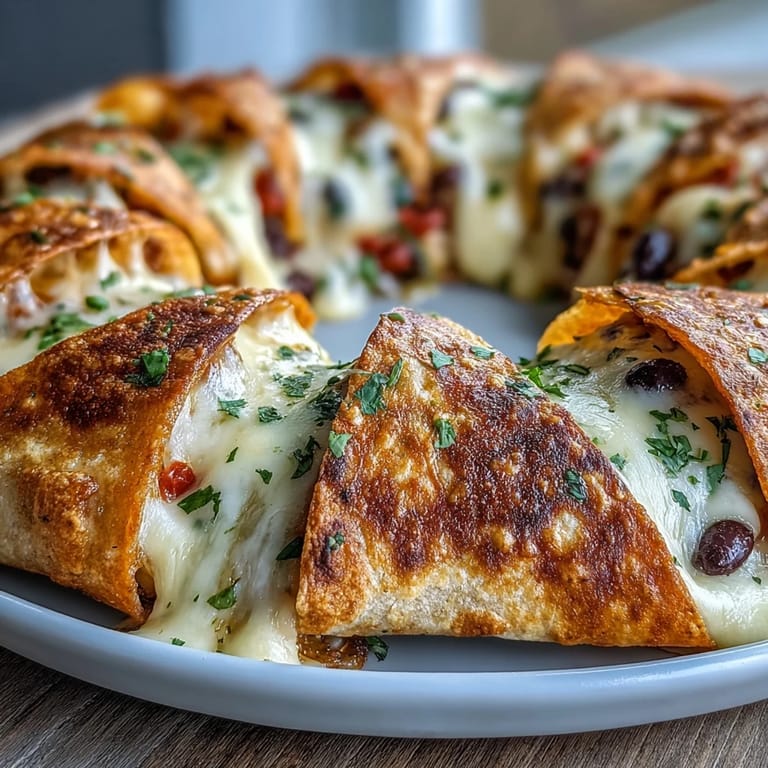
- Lay the quesadilla triangles on the baking sheet with points facing inward and slightly overlapping, forming a tight circle that looks like a blooming flower. This is where it starts to look impressive.
- Brush with butter:
- Use a pastry brush to coat the tops with melted butter, which will help them crisp up and turn golden in the oven.
- Bake until golden:
- Slide the baking sheet into the oven and bake for 18 to 20 minutes, until the tortillas are crispy and the cheese is bubbling. Your kitchen will smell incredible.
- Garnish and serve:
- Carefully transfer the ring to a serving platter, sprinkle with fresh cilantro, and place small bowls of salsa, sour cream, and avocado slices in the center. Add lime wedges on the side and watch everyone gather around.
 Pin it
 The first time I made this for a game night, I put it in the middle of the table and stepped back. My friend reached for a piece, pulled it free, and said, this is the kind of thing that makes people think you're fancy. I wasn't fancy. I was tired and needed something that looked like effort but didn't require much brain power. That's when I realized the best recipes aren't always the hardest ones, they're the ones that make people feel cared for without burning you out in the process.
Making It Your Own
This recipe is forgiving in the best way. I've swapped black beans for pinto, added shredded rotisserie chicken when I had leftovers, and once threw in sautéed mushrooms because that's what was in the fridge. My brother-in-law likes to add pickled jalapeños for heat, and my sister uses a mix of pepper jack and mozzarella instead. The formula stays the same, but the filling can shift depending on your mood or what's on hand. It's one of those recipes that gets better the more you make it your own.
Serving Suggestions
I like to set this out with a few small bowls in the center for dipping, but you can also serve it alongside a big green salad or some tortilla chips and guacamole. If you're feeding a crowd, double the recipe and make two rings on separate baking sheets. It also works as a main dish if you bulk up the filling with seasoned ground beef or shredded pork. However you serve it, make sure there's enough room on the table for people to reach in and pull their own piece, because that's half the fun.
Storage and Reheating
Leftovers can be stored in an airtight container in the fridge for up to two days, though the tortillas will soften as they sit. To bring back some of that crispiness, reheat individual pieces in a 375°F oven for about 5 minutes, or pop them in an air fryer for 3 to 4 minutes. I don't recommend microwaving because the texture gets chewy and sad. Honestly, though, this rarely makes it to the leftover stage in my house.
- You can prep the filling a day ahead and store it covered in the fridge until you're ready to assemble.
- If you're making this for a party, assemble the ring an hour early, cover it loosely with foil, and bake it right before guests arrive.
- For a spicier version, mix in diced jalapeños or a pinch of cayenne with the filling.
 Pin it
 This is the kind of recipe that makes you look like you planned ahead, even when you threw it together an hour before people showed up. It's become my favorite way to turn simple ingredients into something that feels like a celebration.
Recipe FAQ
- → Can I prepare the quesadilla ring ahead of time?
Yes, you can assemble the ring up to 2 hours in advance. Cover with plastic wrap and refrigerate, then bake just before serving for the best crispy texture.
- → What size baking sheet works best for this?
A large 18x13 inch baking sheet provides ample space to arrange the quesadilla triangles in a proper blooming ring shape with room for even browning.
- → Can I add meat to the filling?
Absolutely! Cooked shredded chicken, seasoned ground beef, or crumbled chorizo make excellent additions. Mix them with the cheese filling before assembling.
- → How do I prevent the quesadillas from opening while baking?
Press the edges firmly when folding and ensure the triangles overlap slightly when arranging. The melting cheese will help seal them together during baking.
- → What dipping sauces work well besides salsa?
Try guacamole, queso dip, pico de gallo, chipotle mayo, or jalapeño ranch. Place multiple small bowls in the center for variety.
- → Can I make this gluten-free?
Yes, simply substitute gluten-free tortillas for the flour tortillas. Check all other ingredient labels to ensure they're certified gluten-free as well.