 Pin it
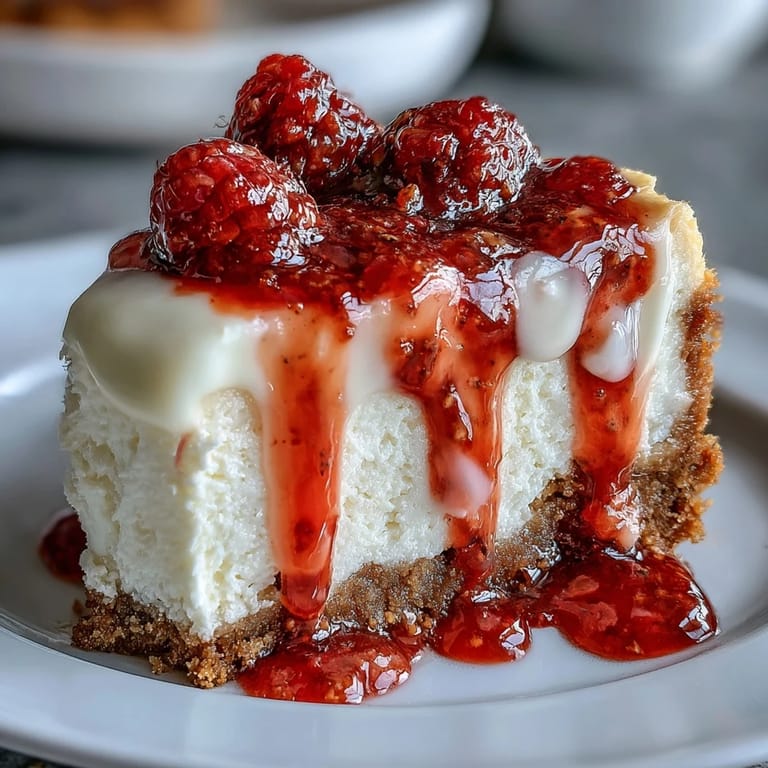
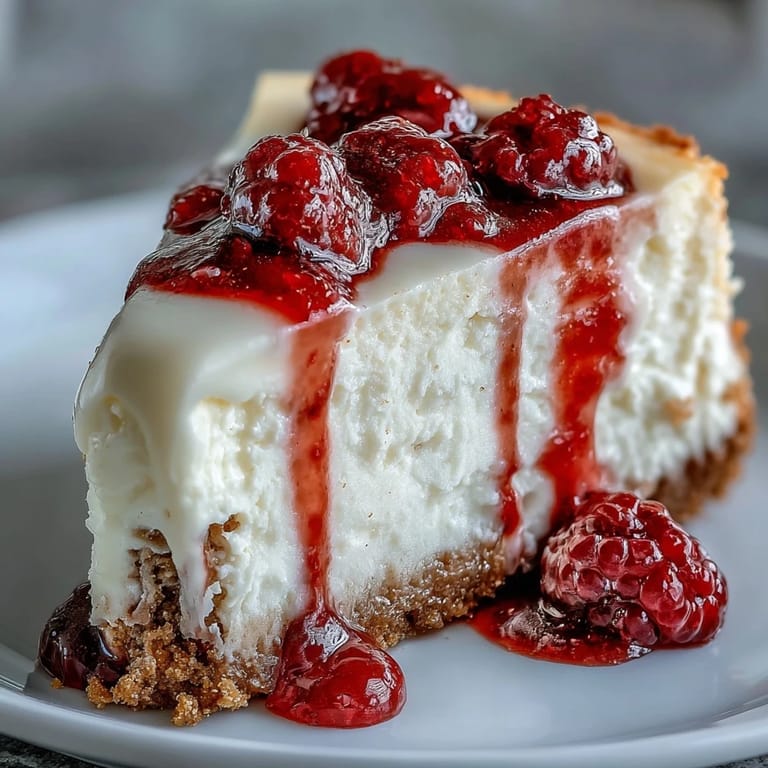
 My neighbor knocked on the door holding an empty plate and asked if I had any more of that pink-swirled cheesecake from last weekend. I laughed because I'd only brought her a single slice, yet here she was, hopeful. That's the power of white chocolate raspberry cheesecake. It doesn't just satisfy a sweet tooth, it creates cravings, starts conversations, and turns casual tastings into polite requests for seconds.
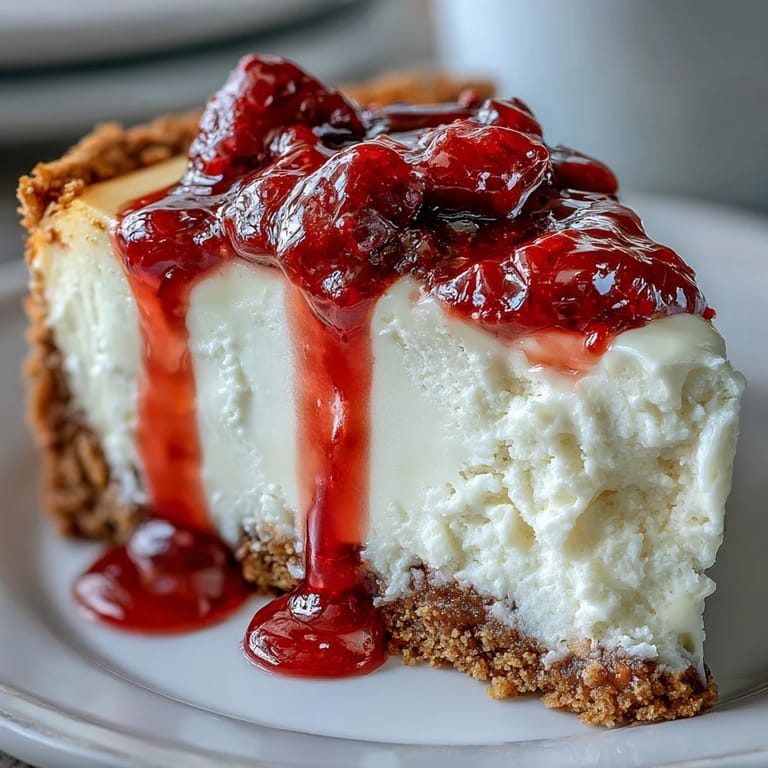
I made this for my sister's birthday dinner, and when I brought it to the table, the room went quiet. Not awkward quiet, but that kind of reverent hush before someone cuts into something beautiful. She insisted we take a photo before slicing, which I thought was silly until I saw how the raspberry ribbons caught the light. Later, she admitted she ate a second slice standing at the fridge near midnight.
Ingredients
- Graham cracker crumbs: The buttery, slightly sweet base that holds everything together; press it down hard or it'll crumble when you slice.
- Granulated sugar (for crust): Just enough to sweeten the crumbs without competing with the filling.
- Melted butter: This is what binds the crust and gives it that golden, toasty flavor after baking.
- Fresh or frozen raspberries: Frozen works just as well as fresh here; I've used both and honestly can't tell the difference once cooked down.
- Granulated sugar (for raspberry filling): Helps the berries break down and thicken; taste as you go since some raspberries are naturally sweeter.
- Lemon juice: Brightens the raspberry sauce and keeps it from tasting flat.
- White chocolate: Use good quality chips or a bar; the cheap stuff can seize up or taste waxy.
- Cream cheese: Must be softened to room temperature or you'll end up with lumps no amount of mixing can fix.
- Granulated sugar (for batter): Sweetens the filling and helps create that creamy, smooth texture.
- Large eggs: Add them one at a time and mix gently; overmixing here creates cracks on top.
- Vanilla extract: A little warmth and depth that plays well with both the chocolate and the berries.
- Sour cream: This is the secret to that tangy richness and velvety mouthfeel.
- Heavy cream: Thins the batter just enough to make it pourable and silky.
Tired of Takeout? 🥡
Get 10 meals you can make faster than delivery arrives. Seriously.
One email. No spam. Unsubscribe anytime.
Instructions
- Prep the pan and preheat:
- Set your oven to 325°F and grease the springform pan well, then line the bottom with parchment. This step prevents sticking and makes removing the finished cheesecake so much easier.
- Build the crust:
- Mix the graham cracker crumbs, sugar, and melted butter until it looks like wet sand, then press it firmly into the pan bottom. Bake for 8 minutes until it smells toasty, then cool completely before adding batter.
- Make the raspberry swirl:
- Simmer raspberries, sugar, and lemon juice in a small pot, stirring often, until the mixture thickens and coats the back of a spoon. Strain out the seeds if you want it smooth, then let it cool while you make the batter.
- Melt the white chocolate:
- Use a double boiler or microwave in short bursts, stirring between each, until it's completely smooth. Let it cool slightly so it doesn't scramble the eggs later.
- Beat the cream cheese base:
- Whip the softened cream cheese and sugar until it's fluffy and lump-free. Add eggs one at a time, mixing just until each disappears, then stir in vanilla, sour cream, and heavy cream until silky.
- Fold in the chocolate:
- Gently mix the cooled white chocolate into the batter until it's evenly combined and pale. Don't rush this or you'll lose the airiness you just created.
- Layer and swirl:
- Pour half the batter over the crust, dollop on half the raspberry sauce, and swirl with a knife in gentle figure-eights. Add the remaining batter, more raspberry sauce, and swirl again, this time a bit deeper.
- Prepare the water bath:
- Wrap the outside of the springform pan tightly in two layers of foil to keep water out. Set it in a roasting pan and pour hot water around it until it reaches halfway up the sides of the springform.
- Bake low and slow:
- Slide it into the oven and bake for 60 to 70 minutes, until the edges are set but the center still has a slight jiggle. The water bath keeps the heat gentle and prevents cracks.
- Cool gradually:
- Turn off the oven, crack the door open, and let the cheesecake sit inside for an hour. This slow cooldown prevents sudden temperature shock that causes cracking.
- Chill completely:
- Remove from the water bath, discard the foil, and refrigerate for at least 4 hours or overnight. The flavors meld and the texture firms up beautifully as it rests.
- Garnish and serve:
- Run a thin knife around the edge before releasing the springform, then top with extra raspberry sauce or fresh berries. Dip your knife in hot water between slices for clean cuts.
 Pin it
 The first time I served this at a dinner party, someone asked if I'd ordered it from a bakery. I took it as the highest compliment, even though I'd spent the afternoon swearing at the water bath setup. Now I make it whenever I want to feel like I've really accomplished something in the kitchen, because honestly, pulling a perfect cheesecake out of the fridge never gets old.
Choosing Your White Chocolate
Not all white chocolate is created equal, and I learned this the hard way when a bargain bag seized into a grainy mess. Look for bars or chips that list cocoa butter as the first ingredient, not palm oil or vegetable fat. The real stuff melts smoothly and tastes creamy, not waxy. I've had great results with Ghirardelli and Lindt, and even some store brands work fine as long as you check the label.
The Water Bath Trick
Wrapping the springform pan in foil feels fussy, but it's worth it. Water seeping into your cheesecake turns the crust soggy and ruins hours of work. I use two layers of heavy-duty foil and press it tightly around the outside, going all the way up the sides. Some people use a slow cooker liner or a large oven bag as an extra safeguard, which works if you're feeling cautious. The water should be hot when you pour it in, and it should come halfway up the pan, no higher.
Storing and Serving
This cheesecake keeps beautifully in the fridge for up to five days, covered loosely with plastic wrap or foil. The flavors actually improve after a day or two, so don't feel rushed to serve it immediately. If you want to freeze it, wrap individual slices tightly in plastic, then foil, and freeze for up to two months. Thaw them in the fridge overnight, and they taste nearly as good as fresh.
- Serve it cold straight from the fridge for the firmest texture and cleanest slices.
- Let it sit at room temperature for 10 minutes before serving if you prefer a creamier, softer bite.
- Garnish just before serving so the berries stay bright and the sauce doesn't bleed into the top.
 Pin it
 This cheesecake has become my go-to whenever I want to impress without pretending to be someone I'm not. It's rich, it's gorgeous, and it tastes like you spent way more effort than you actually did.
Recipe FAQ
- → How long should cheesecake cool before refrigerating?
Let the cheesecake cool in the oven with the door cracked for 1 hour after baking. This gradual cooling prevents cracking. Then refrigerate for at least 4 hours or overnight for the best texture and clean slices.
- → Can I use frozen raspberries for the sauce?
Yes, frozen raspberries work beautifully. You may need to adjust the sugar slightly depending on their natural sweetness. Cook them down with sugar and lemon juice until thickened, then strain if you prefer seedless sauce.
- → Why do I need a water bath for cheesecake?
A water bath provides gentle, moist heat that helps the cheesecake cook evenly without cracking or browning too quickly. It ensures a creamy texture throughout while preventing the center from sinking as it cools.
- → How do I know when cheesecake is done baking?
The cheesecake is ready when the edges are set and slightly puffy, but the center still has a gentle wobble when you gently shake the pan. It will continue firming up as it cools, so avoid overbaking.
- → Can I make this cheesecake ahead of time?
Absolutely. This cheesecake actually improves after chilling overnight. You can make it up to 2 days in advance. Keep it refrigerated until serving, then add fresh garnishes just before presenting for the best appearance.